
Small engine starting problems (part 2)

In Part One we ticked off the simple maintenance-related causes of bad starting – old fuel, wrong fuel mix, dodgy air cleaner – then trundled off to investigate the three pillars on which a happy engine rests: Compression, ignition and fuel.
We left ignition testing dangling at the point where the obvious had been eliminated and more detailed digging was about to start, so on we go.
See also: Small engine starting problems (part 1)
To start promptly an engine needs a clean, dry plug firing a fat spark at the right instant. About five times the energy is needed to create that spark under compression than to make it in air, so not just any old spark will do.
Tip 1 – check ignition system
When you’re fresh out of sparks, your options depend on which type of ignition the engine has. Older motors use mechanical contacts to initiate the spark, and these can be fiddled with.
From the early 1990s contacts were replaced by solid-state contactless setups, which are inscrutable.
If you have the contactless type and it refuses to throw a spark even though the kill switch, the wiring and the armature air gaps (see next) are good, then the ignition pack is dead and the game’s over. Pack replacement is the only option.
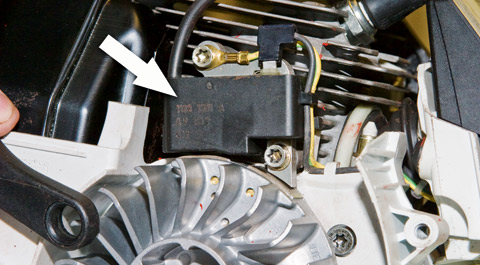
Tip 2 – measure air gap
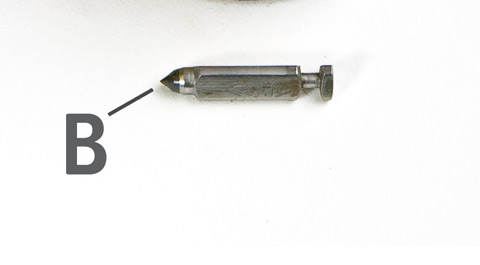
Both types of ignition must have an air gap between the coil’s armature poles (A) and the magnetic segments of the flywheel (B).
If you have no other info, a gap of 0.2mm (0.008in) should do. To adjust, position the flywheel segments under the armature poles, then slip a feeler gauge of the right thickness between them.
Slacken each coil mounting screw to set the gap. Check for vertical play in the crankshaft support bearings, as movement here will affect (and maybe close up) the gaps, interfering with spark production.

Tip 3 – clean mechanical contact systems
Mechanical contact systems can be cleaned and adjusted. Usually you’ll need to take off the flywheel to get at the points, for which it’s best to knock up a small puller (below) – this one has different hole sets for various flywheels.
Resist the temptation to use levers under the flywheel and/or whack the crankshaft nose, as you’ll very likely damage something.
Tip 4 – photograph timing marks
With the flywheel off and points exposed, take a snap or make a sketch of what goes where and the relative positions of any timing marks on the points’ baseplate.
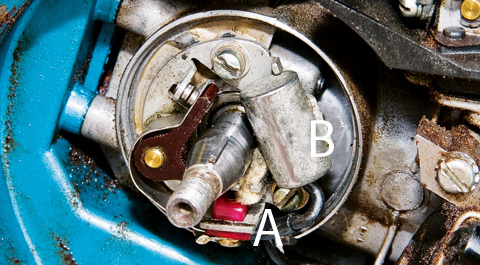
Take the assembly apart, noting the place of the insulating sleeves and washers (red, A) – these must go back correctly or there can be no spark.
Degrease everything including the backplate. Either fit new points or reface the old ones a fine file or oilstone is good. Degrease the refaced points and rebuild the contact assembly. If the points were badly burnt, fit a new condenser (B).
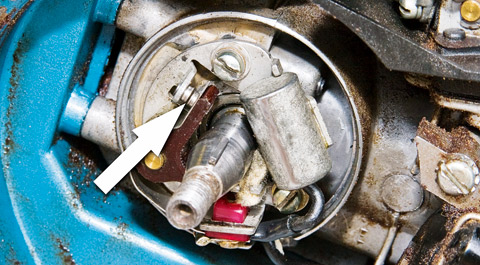
Tip 5 – set gap between points
If necessary temporarily re-fit the flywheel, then turn the crank until the points are potentially wide open (arrow). Set the gap according to the book, or to 0.5-0.63mm (0.02-0.025in) if in doubt.
Find a good spark plug, anchor it to the cylinder fins well away from the plug hole, then test for a spark by flicking the flywheel round. If you see no spark, double-check that the points are clean by drawing several slips of clean newspaper between them.
If there is still no joy and you’re sure that the contact breaker’s insulators went back in the right places, then the ignition coil is dead and must be replaced.
Once you’ve confirmed a healthy spark is fired at the right time, then – and only then – turn to the fuel. Fresh, lively petrol is central to easy starting, so drain and refill the tank and carb after winter or extended summer storage see Part One.
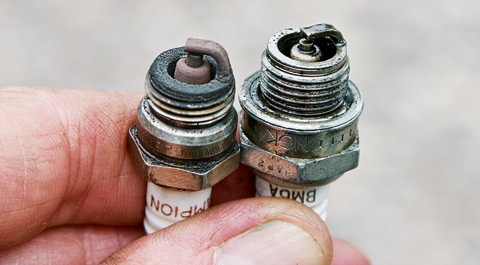
If the engine won’t fire up on fresh fuel (and the tap, if any, switched on (!), extract the spark plug. The route you take from here depends on whether the plug is wet or dry.
*Safety: Danger from fire and fuel vapour. Wear eye protection, protective gloves and work in an open space. Clear fuel spills quickly. When turning over the engine with the plug removed, disable the ignition.
Tip 6 – clear exces fuel
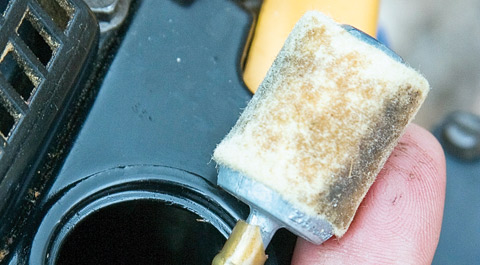
A wet plug (below) is very common, especially after too much heaving on the starter rope with the choke on.
First clear excess fuel from the engine. Take out the plug and disable the ignition. Invert the engine if you can, then with the fuel turned off (where possible), the choke not set and the throttle wide open, pull the starter several times to clear and evaporate fuel from the motor.
Fit a clean, dry plug – not the one you’ve taken out, even if you’ve tried cleaning it. With the fuel still off and the choke not closed, try starting.
If the engine doesn’t fire, try a little choke and increase it if necessary. If still no go, pull out the plug. If it’s wet again, go to (7).
Tip 7 – check choke opening
Is the choke opening on demand? Some chokes close automatically then open in response to vacuum when the engine spins.
Check by taking off the air cleaner, replacing the central bolt and working the starter the flap (below) should flutter open and shut. If it stays closed the engine will flood and the plug will wet up.
Fit a clean plug, hold the flap open with a screwdriver and try again. If the engine fires and runs until you release the flap, there’s the problem.
Tip 8 – check choke flap
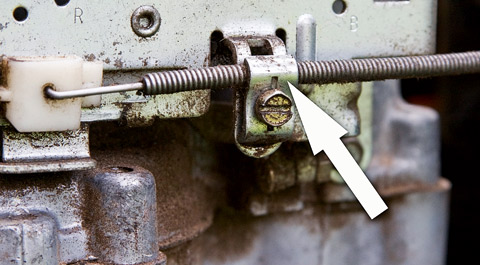
Some small four-strokes have a choke flap that closes only when the throttle is moved to ‘start’. If the throttle cable isn’t adjusted properly this won’t happen.
Take off the air filter and find the choke flap. Slacken the cable clamp screw (arrow) and with the control lever in the ‘start’ position, then move the outer cable until the choke flap is completely closed.small engine.
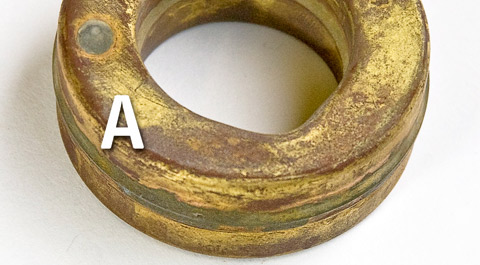
Tip 9 – examine carb float
Conventional carburettors will flood if the float takes up fuel, or if the needle valve wears, jams or gets dirt in it. With the carb on the bench, take off the chamber below the carb body and release the float and needle valve.
Watch for any tiny seals above the valve. Rattle a metal float to see if it’s taken in fuel (A) or feel the weight of a synthetic one.
The valve’s tip should be a fine point with no ridging (B). Clean all parts and replace any dud bits.
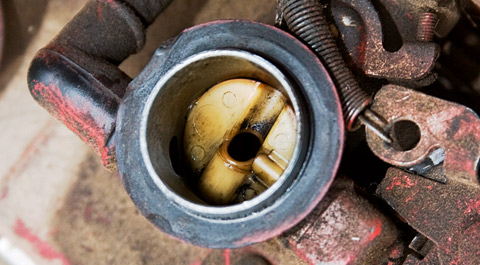
Tip 10 – water in fuel
Water in the fuel can block jets. The engine may fire but not run and the plug will be wet. Look in the float chamber this one has had water in it which rusted the chamber floor.
Clean the carb, refill with fresh fuel. Clean-out procedures are much the same with the other types of carburettor found on small engines, i.e the diaphragm variety (used when the engine must run in all positions, like chainsaws) and designs where the carb is built into the top of the fuel tank, as in many Briggs and Stratton motors

A dry plug, even with fuel in the tank and the choke on, tells you that fuel is not making it into the engine. .Often the reason is straightforward – see below. Otherwise the carburettor must come off for a complete strip, which is beyond our brief here.
Tip 11 – fish out tank filter
Where the spark is healthy but the plug stays dry, even with the choke on, fuel may not be leaving the tank. Taking precautions against spillage, ease the fuel line off the carburettor union fuel should flow freely from it.
If not, fish out any tank filter (below) and see that it’s clean do the same with the fuel cap breather. If the tank has a tap, drain the contents then take out the tap and check its filter.
See the fuel line is not kinked or blocked. Some carbs have their own filter, either in the inlet union or internally.
Tip 12 – look for linkage problems
If there’s a linkage problem, the choke flap may not be completely closed – even though the operating lever says it is. Take off the air cleaner and see that the flap (arrowed) shuts fully as the control is operated.

