
Getting the best from your seeder unit
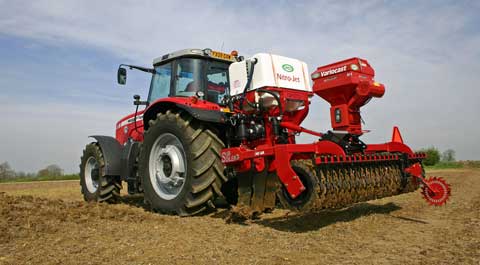
Over the past five years oilseed rape seeders piggy-backing on sub-soilers, stubble cultivators and harrows have become commonplace on arable units where growers have been keen to cut establishment costs.
Similarly grass-harrows with seeder-units have gained considerable popularity on livestock farms.
Market leader in this field – Opico – has sold more than 2,000 of its Hatzenbichler Variocast seeders since they were introduced in 1998. Not the cheapest option, thanks to a roller metering system, they offer a greater level of accuracy than any broadcaster could ever hope to match.
When you consider the cost of small-seed such as OSR, grass, clover and kale, just being 0.1kg/ha over the target seed rate could cost a lot of money. Getting the metering system correctly set up and calibrated is key to this and won’t take long.
Several different Variocast variants are out there, some with mechanical ground-speed metering, others using an electronic set-up or radar. However the same principles apply to all.
The seeders’ twin electrically driven fans require a 30amp current running at a constant 12V. That means the standard cigarette-lighter supply won’t be man enough. All Variocast units come with a wiring loom that needs to be connected direct to the battery.
With a multi-meter check that the voltage and current are correct at the fan terminals.
“One of the most common issues we get is where the fans are wired up with the wrong polarity so they spin in the wrong direction,” explains Opico’s James Woolway. “Check that they’re spinning the way the sticker on the guarding indicates.”
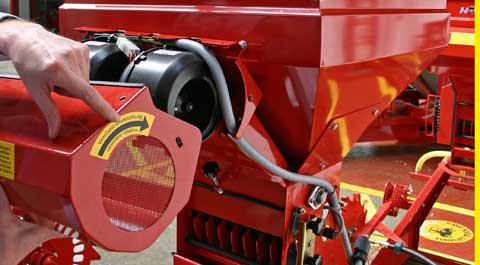
Fan maintenance is pretty straightforward. Every eight hours remove the cowling, clear any debris that has accumulated and blow out the twin turbines with an air-line. Look out for dust sticking to the vanes – it will set like concrete and can put the fan out of balance, ultimately overloading the bearings. Squealing indicates that things aren’t right and each of the Bosch fans costs £180 to replace.
Standard on seeders with electronic rate control and an option on mechanically metered versions from 2008 onwards, a paddle-switch senses airflow and sounds a buzzer in the cab if it drops below a certain level.
Models from 2009 onwards gain a sealed cowling with butterfly nuts and a finer mesh to keep chaff out.
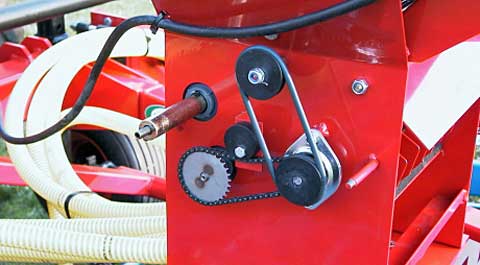
On mechanically metered Variocasts, flexible cable transfers drive from the land-wheel to a gearbox. This allows the operator to vary seed-rates via a lever on the left-hand side of the hopper.
On electrically controlled versions a motor replaces the gearbox and its speed varies according to the target seed rate (set in the control box) and a forward speed signal sent from a pulse sensor on the land-wheel.
In both cases the gearbox or motor transfer drive to the seed metering roller via a belt and pulley set-up. Two belts come with the machine – a longer one drives the hopper agitator and a shorter leaves it disengaged. Keep it running to keep grass-seed flowing, but use the shorter belt for OSR to avoid damaging the seed and overloading the gearbox.
The belts never fail, but on earlier versions a chain drive was used which may need a bit more attention. With the cover off just give everything a light coating with WD40.
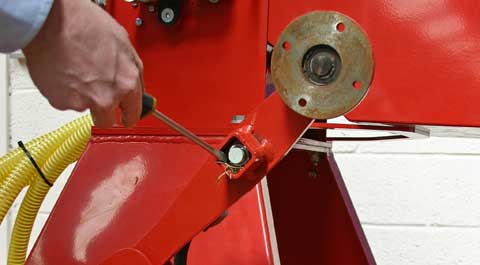
On mechanical machines, grease the cable drive sheath and check it runs in a smooth curve so that the wheel spins freely.
Electrically controlled versions have a small pulse sensor hidden inside a short length of box section. Un-bolt the wheel and clear out any trash that might have accumulated around the sensor. Its position is adjustable and it should be set to run 4-6mm away from the wheel’s plastic disc. The control box has a sensor check mode which will diagnose any fault with the electrical circuit.
Variocasts have a choice of four different seed rollers. The standard green version is used for grass, the blue for finer seed such as OSR. Optional beige dimpled and red micro rollers provide even more precision for especially small seeds.
To remove them it’s a case of un-bolting the end bracket on the right-hand side of the hopper and sliding it out. Clean out the whole metering unit before calibrating by removing the back-plate and roller and blowing it through with an air-line.
Before putting it back together give the copper spindle bushes a smear of copper-slip.
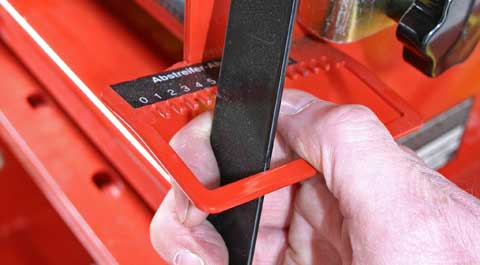
A brush runs on the top side of the roller to ensure the right amount of seed travels round with each rotation. It’s positioning is critical for seed rate accuracy. A lever on the right-hand side of the unit sets it – 0,1 or 2 for OSR and 3,4 or 5 for grass. When the seeder is out of work, the brushes should be lifted clear of the roller to stop the bristles becoming bent.
Both 150-litre and 400-litre hoppers have a sealed lid to ensure there is no back-flow of air as the unit empties. Without the seal intact, light, small seeds can be whipped up into a storm before the hopper is fully empty. Run a hand around the lid with the fan running to check for leaks
With the metering unit back plate removed, the tops of each seed-pipe are easily accessed. Check for mice and blow them out.
When mounting a seeder on a new machine ensure the inner hopper outlets feed the furthest reaches and those closest are fed by the outside pipes – this makes best use of the airflow which tends to be strongest at the centre of the metering unit.
Calibration for both electronic and mechanical seeders is straightforward, the only difference being that the latter requires a bit of maths while the control box does it for you.
Remove the metering unit back-plate and slide the calibration tray under the seed roller.
If using an electronic seeder, enter the calibration screen and set the target seed rate. Also check the machine width is correct and, once a year do a measured 100m run so that the computer knows how many land-wheel revolutions are required. Bear in mind the lugs will sink more in soft ground so run it on a similar surface to that which it will be working on.
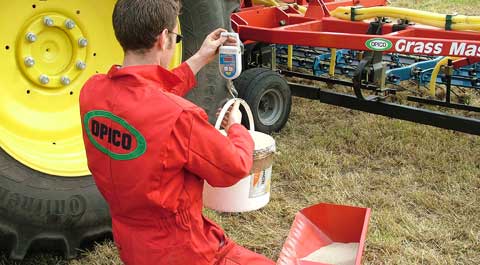
Next hit the F5 button and the box will set the roller running for a predetermined number of revolutions. Weigh the seed using an accurate set of scales and enter the amount into the box – the computer then calibrates itself.
With a mechanically metered seeder set the seed rate adjuster lever to the required output – each increment on the 0-40 scale equates to approximately 1kg/ha. Check the brush setting and then rotate the drive wheel 50 times.
Weigh out the seed and enter the result in the following formula:
Land-wheel circumference x land-wheel revs x working width x seed weight = quantity of seed/area
For example:
6m machine
1.35m land-wheel circumference
50 land-wheel revs
0.6kg seed collected
10,000sq m
1.35m x 50revs x 6m x 0.6kg = 14.8kg/ha
If the desired seed rate isn’t matched by this move the lever and re-calibrate to give an indication of how much the rate alters for every notch of movement.
