
Ten steps to better gas welding
Introduction
Welding processes come and go, but gas and the farm workshop remain in blissful wedlock. Not surprising really, as oxy-acetylene equipment can weld, heat and cut – three things vital to keep machinery going.
The rise of MIG means that gas welding isn’t the force it was, but if you have the equipment, it’s daft not to exploit the welding side of it. We’ll concentrate on ways to more effective gas cutting and heating.
Fuel gas is a good place to start. Flame heat comes from burning a fuel in oxygen – air alone doesn’t carry enough O2 to give a complete burn – and for farm-scale work the choice is propane or acetylene.
Propane fuel is cheaper, uses more oxygen for full combustion, produces less heat (around 2800C) and its more diffuse, cooler flame is grand for heating big areas but can’t weld steel.
Acetylene burns hotter at about 3200C in a more concentrated flame, although this is more sensitive to distance from the work (which makes piercing harder) and isn’t so good at heating big areas.
When choosing between gases it is necessary to look at the whole package cost – including cylinder rental – in relation to the use you’ll make of it, and to decide if you can harness the potential to gas weld. Bear in mind that depending on the volume of work done, fuel gas usually accounts for only a small proportion of job cost. For many, oxy-acetylene is the way to go.
What decides effective cutting and heating? Equipment choice, set-up and maintenance account for maybe 70% of it, operator skill the rest. Which explains why most of the info that follows is concerned with the kit itself. It’s assumed that the farm’s gas gear is in good physical condition, that cylinder regulators are appropriate for the gases and maximum fill pressures, and that the operator knows how to light and shut down the set properly – see Staying alive.
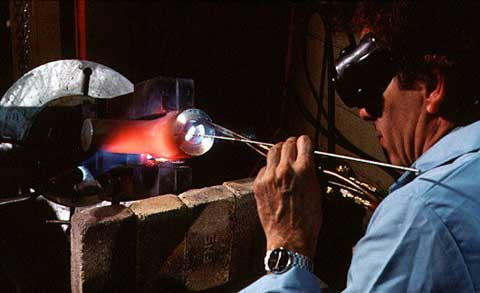
1 Square up
A new nozzle’s pre-heater holes (A) and central cutting orifice (B) have square edges and parallel sides. In use the edges round off and the holes turn bell-mouthed so the gas streaming from them starts to tumble.
The nozzle becomes prone to backfiring, the pre-heater flames are diffused, the cutting oxygen stream is upset. Cuts take longer to start, can’t proceed as quickly and are prone to stop.
The cut line (or kerf) will be wider than it should be, thickness capacity drops and the cut is more likely to fill with foamy oxide residue. Plenty of reasons, then, to keep a used nozzle (right) looking like a new one.
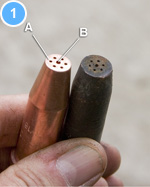
2 Titivate
Reclaim a worn nozzle by filing the business end square. It’s a soft copper alloy, so work gently with a smooth file.
Clear each hole using the right-sized reamer (a set is only about £2) minding not to turn the passage oval, open it up or break off the reamer. There’s plenty of scope for refacing – compare new and part-used nozzle lengths (inset).
Refit and check the flame, which should be symmetrical when seen from the side and above. If it isn’t – or if one or more flames won’t come to neutral (see 5) – then re-face and re-ream.
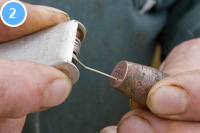
3 Check again
 While you’re cleaning, cast an eye over the nozzle’s stacked seats (1-3).
Minor scuffing or carbon build-up can produce a sulky yellow flame from around the retaining nut, often curable by rotating the nozzle in the blowpipe head. Throw out a nozzle with visible damage.
4 Heat options
Every nozzle can deliver a range of heat depending on the volume of fuel gas passing through it. Set the baseline when lighting-up.
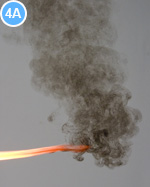
With the correct pressures dialled in at the regulators and the gas lines thoroughly purged, light the acetylene and adjust flow at the blowpipe needle valve until greasy smoke (A) just clears from the flame’s tip. The flame will be bright and should be attached to the nozzle – not separated like (B).
In work, vary flame heat by adjusting acetylene flow at the needle valve and rebalancing the flame to neutral. If a healthy nozzle running the right pressures can’t cut the required steel thickness, you’re either travelling too fast or need to change it for the next size up.
If the nozzle pops and bangs in work, acetylene flow is too low. This is dangerous back firing, so quickly increase flow at the needle valve. If the nozzle whistles, a flame is burning up inside it. Shut-off or the nozzle will overheat and melt.

5 Flame types
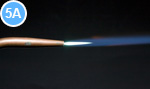
Acetylene burns most completely, and produces most heat, when combined with an equal volume of oxygen. This neutral flame is needed for cutting and welding.
When there is more oxygen than fuel gas the flame is oxidising when there is more carbon-rich fuel gas in the mix the flame is carburising. A-C show flame types from a welding nozzle they look the same with cutting gear.
 |
 |
 |
 |
To make a neutral flame for gas cutting, start with all three blowpipe needle valves shut. Set the acetylene flame bright, open the blowpipe’s oxygen needle valve fully so it has no effect on flow, then gradually feed oxygen to the flame from the cutting attachment’s needle valve. The flame will turn blue-white.
Add more oxygen until the white area shortens into a feather (A: carburising flame), then a little more until the feather blends into the flame’s central blue cone.
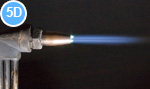
Now the flame is how you want it: neutral (B). Adding more oxygen makes the cone turn a more intense blue, go spiky and the flame start to hiss (C) – now it’s oxidising. Hold down the cutting lever. The flames should stay mostly neutral adjust oxygen with the cutting attachment needle valve until they are (D).
This last step matters: pre-heater flames must be neutral in the cutting condition. If one or more isn’t, then ream, reface and blow out the nozzle.
6 Right height
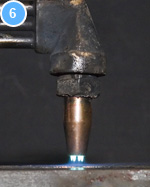 The hottest part of the flame is just beyond the blue cones. To start a cut quickly at an edge, put all the pre-heater flames on the plate next to the edge and hover the cone tips 3-4mm over it.
Once the metal hits red heat, swing the nozzle away. Feed in the cutting stream fully, swing the nozzle back over the plate and the cut will start.
Let it reach full depth (shown by slag draining freely from below) before moving off. Keep the nozzle square to the work and at the right height.
To start piercing a hole, do the same – but start with the pre-heaters 8-10mm off the plate, feed in cutting oxygen very gently and lift the torch as the cut begins. This minimises the chance of spatter blocking the nozzle.
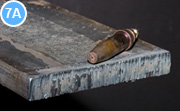
7 Quality result
Here’s a reasonable freehand cut in 20mm plate, before clean-up (A). Spot the square edges, flat face, vertical drag lines and minimal dross.
 |
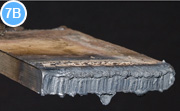 |
See what happens (B) when acetylene flow (and perhaps nozzle size) are too much for the steel thickness, or travel speed is too slow the top edge is badly rounded, the cut face is burnt and dross clings to the underside.
8 Spot the line
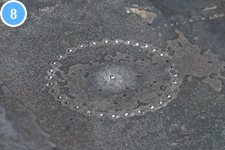
When you need to see exactly where you’re freehand cutting, centre-punch dots along the cut line. A circle cutting attachment is best for slicing neat holes.
If you don’t have one, use the middle dot’s quick-heating, raised edges as a convenient place to start piercing. Alternatively mark lines with a soapstone stick (available from welding suppliers), which tolerates heat better than ordinary chalk.
9 Go loopy
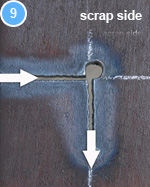
To produce a relatively tidy corner, use the fieldwork technique. Carry the cut into the scrap side of the plate, make a loop turn and march off in the new direction.
The same idea helps when you need to shift position during a long straight cut: loop into the scrap side and use the lay-by you’ve just made to stop and start in. If you stop on the cut line, the re-start always wants to notch the work.
10 Heat quickly
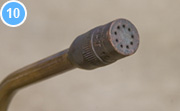 Cutting nozzles are designed only for cutting. To put heat faster and more economically into steel, use a purpose-made heater nozzle teamed with a heavy-duty mixer and extension tube.
Be sure to use the right, higher initial gas pressures and the modified procedure detailed in Heating setup. Propane and super-heating nozzles can deliver much more heat as propane can be fed faster to the flame.
Got any questions?
*Got any queries regarding welding issues? We’ll try to answer them on our website forums and, if we can’t find the answers, we’ll find someone that can. Visit www.fwi.co.uk/welding to post your questions.
If you found this article useful, you might like to know that Andrew Pearce has written a book. Farm Workshop and Welding explores the common arc processes including MIG and TIG, covers gas welding in its various forms and details cutting with gas and plasma. Other sections deal with cast iron, welding pipe, hardfacing, soldering and joining plastics. Beyond welding, the use of taps and dies, drill sharpening and simple blacksmithing are explained.
Farm Welding and Workshop runs to 184 pages, costs £19.95 and will be available in October from Old Pond Publishing (01473 238 200, www.oldpond.com) previous book – Farm Welding – was published by Farming Press in 1992 and is available from bookstores.
